
I’ve spent years helping clients transform their flat, straight hair into enviable flowing styles, and I’ll tell you – long layers are the not-so-secret weapon. When done right, they’re game-changers that add bounce, movement, and life to even the most stubborn straight strands.
Whether you’re dealing with fine hair that won’t hold volume or thick locks that feel heavy, there’s a layering technique that’ll work for you. Let me share what I’ve learned.
Why Long Layers Work Magic on Straight Hair

Many straight-haired beauties struggle with flat, lifeless locks – but long layers are your secret weapon for instant transformation.
I love how strategically-cut layers create movement and volume, letting your hair bounce and flow naturally.
They remove bulk from the bottom while maintaining length, giving you that coveted cascading effect.
Trust me, layers will make your straight strands look effortlessly chic and full of life. Additionally, short hairstyles for women over 40 can enhance your overall look by bringing out your features and adding a fresh flair.
Choosing the Right Layer Length for Your Face Shape

Every face shape needs a tailored approach when it comes to layering straight hair.
Let me break down the perfect layer lengths for you:
- Long layers starting at chin level beautifully frame round faces.
- Face-framing layers beginning at the cheekbones enhance oval shapes.
- Shorter layers around the crown add height to square faces.
- Mid-length layers starting at the jawline balance heart-shaped faces.
Adding layers not only provides movement but also helps to create the illusion of a more voluminous look that can elevate any haircut.
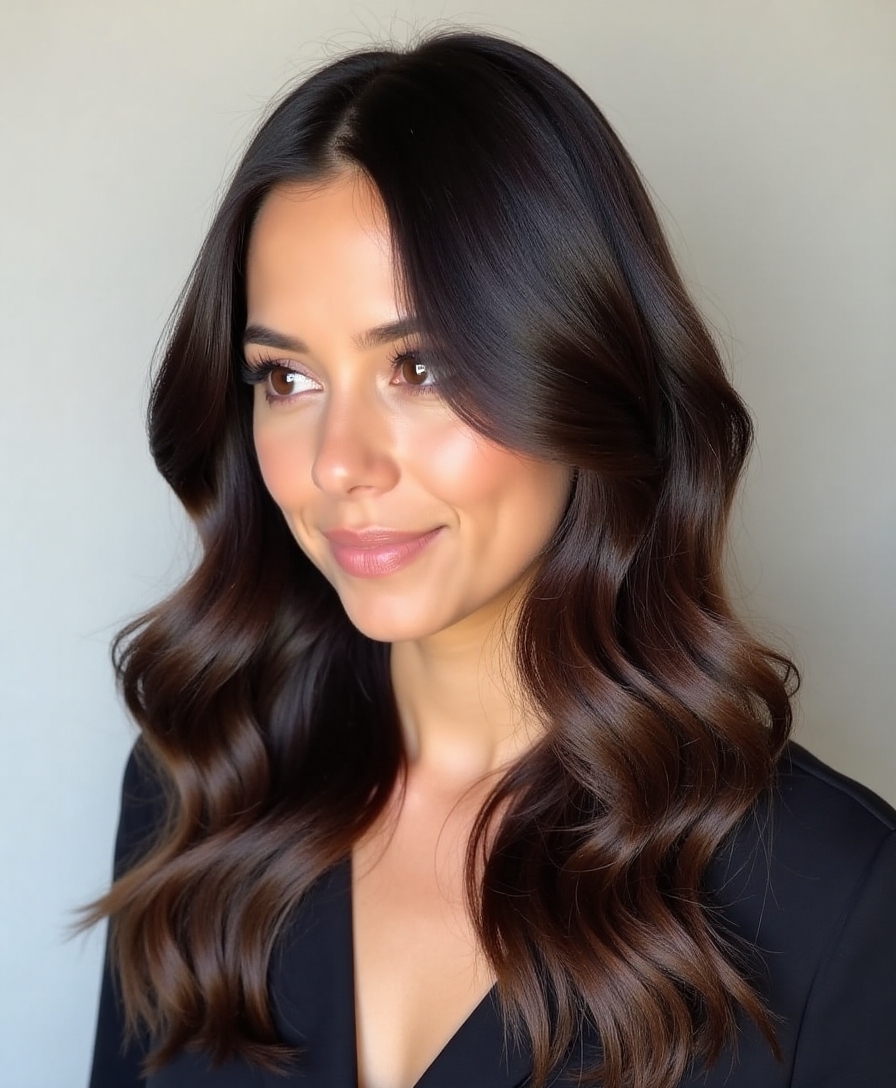
Best Long-Layered Cuts for Fine Straight Hair

I’m excited to share three stunning long-layered cuts that’ll transform your fine straight hair into a masterpiece of movement and volume.
For face-framing layers that enhance your features, I’ll show you how a soft, invisible layering technique creates the illusion of thickness without sacrificing length.
The classic V-cut brings the perfect balance of sophistication and style, giving your fine straight hair the subtle movement it needs while maintaining that enviable length you love.
Additionally, incorporating elements from razor cut bob styles can also add texture and definition, enhancing the overall effect of your long layers.
Face-Framing Long Layers
Face-framing layers are a perfect match for fine straight hair, giving you movement and dimension without sacrificing precious volume. When styled correctly, these layers will enhance your features and add bounce to your hair. Additionally, adding volume-boosting techniques can help elevate your look even further.
- Start the shortest layer at chin level
- Keep subsequent layers long and subtle
- Ask for soft, wispy ends rather than blunt cuts
- Style with a round brush for maximum face-framing effect
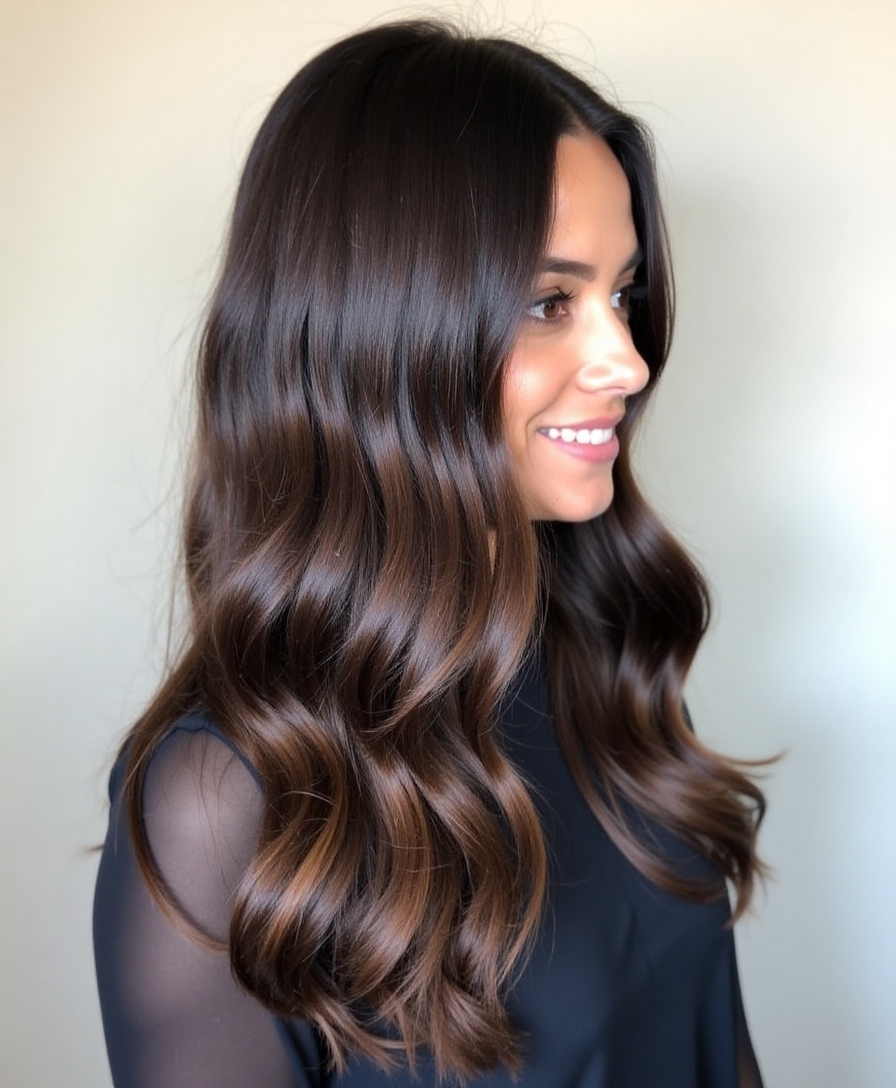
V-Cut With Movement
While face-framing layers add softness around your features, a V-cut brings dramatic flair to straight, fine hair.
I love how this cut creates a striking point at the back while maintaining seamless layers throughout.
The V-shape adds natural movement and volume, making your hair appear thicker.
Trust me – this trendy cut will turn your flat strands into a flowing masterpiece.
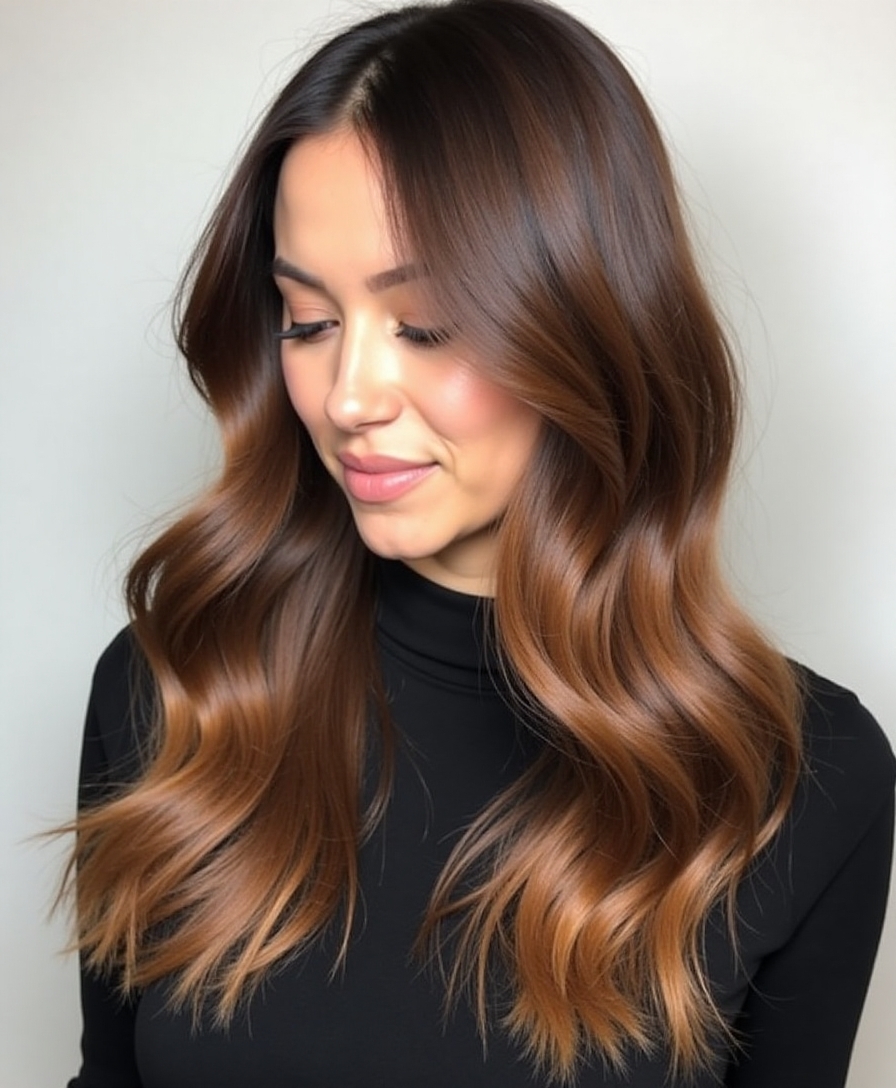
Soft, Invisible Layer Technique
The soft, invisible layer technique revolutionizes how we approach fine, straight hair. I’ll show you how to achieve that barely-there layered look that adds natural movement without obvious chunky steps.
- I start by point-cutting hair at a 45-degree angle.
- I create ultra-thin sections no wider than 1/4 inch.
- I subtly graduate lengths by less than 1/2 inch between layers.
- I texturize only the very ends to maintain seamless blending. Additionally, this technique is considered one of the best ways to achieve flattering haircuts for fine hair, enhancing volume and movement without sacrificing hair health.
Maintenance Tips for Long-Layered Straight Styles

I’m excited to share my top maintenance secrets for keeping those gorgeous long layers looking their best.
When it comes to heat styling, I always recommend using a quality protectant spray before touching any hot tools to your strands.
To maintain the perfect shape of your layers, I suggest booking trim appointments every 8-10 weeks, which prevents those pesky split ends from traveling up your layers and ruining their flow.
Daily Heat Protection Routine
Protecting your straight, layered locks from daily heat styling requires a reliable defense strategy that won’t weigh down your hair or compromise its natural movement.
- Start with a lightweight heat protectant spray, focusing on mid-lengths to ends.
- Apply your product to damp hair before blow-drying to seal the cuticle.
- Consider a silk pillowcase to minimize friction and preserve your style.
- Use thermal tools under 400°F to maintain hair health without sacrificing smoothness.
Long Layer Trim Schedule
Regular maintenance is key for keeping those gorgeous long layers looking fresh and fabulous.
I recommend booking trims every 10-12 weeks to prevent split ends from traveling up your strands.
If you’re growing out your layers, you can stretch it to 14 weeks, but don’t wait longer – those ends will rebel!
Schedule your next cut before leaving the salon.
Face-Framing Layers That Enhance Your Features

When it comes to transforming straight hair, face-framing layers are your secret weapon for enhancing your best features.
I’ll show you how to customize layers that perfectly complement your face shape:
- For round faces, I recommend longer layers starting at the chin.
- Oval faces shine with layers beginning at the cheekbones.
- Heart-shaped faces need shorter, wispy layers around the jawline.
- Square faces benefit from soft, graduated layers starting at mid-cheek.
Styling Products That Maximize Layer Movement

I’ll share my favorite styling products that’ll make your layers come alive with movement and bounce. For ideal results, I start with a lightweight mousse rather than heavy creams, followed by a heat protectant before using hot tools on those gorgeous layers.
A few spritzes of texturizing spray at the roots and mid-lengths will give your layers that coveted volume while maintaining their natural flow. Additionally, using products designed for medium wavy hairstyles can enhance the texture and definition of your layers.
Lightweight Mousse Vs. Creams
The right styling product can make or break how your long layers move and flow throughout the day.
I’ve found that choosing between mousse and cream comes down to your hair’s unique needs.
- Lightweight mousse gives airy volume without weighing down layers.
- Creams offer smoothness but can feel heavy on fine straight hair.
- I use mousse for humid days when I need lasting bounce.
- Creams work best when I want sleek, defined layers.
Additionally, incorporating long layered styles into your haircut enhances the natural movement and texture of straight hair.
Heat Protection While Layering
Since heat styling is essential for perfecting those long layers, protecting your hair should be your top priority.
I always start with a lightweight thermal spray before blow-drying, then add a second protective barrier before using my flat iron or curling wand.
I’ve found that silicone-based protectants work best, creating a shield without weighing down those gorgeous layers.
Texturizing Sprays Add Volume
When styling long layers, texturizing sprays become your secret weapon for achieving that coveted volume and movement.
I’ll show you my favorite ways to maximize the power of these game-changing products:
- Spray directly onto dry roots, lifting sections for even distribution
- Scrunch upward from ends to midshaft while blow-drying
- Focus application on the crown area for lasting lift
- Mist lightly between layers, then tousle with fingertips
Common Mistakes to Avoid When Getting Layers

Although getting layers can transform your straight hair into a masterpiece, rushing into them without proper planning often leads to styling nightmares.
I’ve seen too many clients regret getting super-short layers that won’t tie back neatly, or layers cut too bluntly that create unflattering steps instead of fluid movement.
Always communicate your styling routine and lifestyle needs to your stylist first. Additionally, consider asking your stylist for layered pixie cut ideas that can also complement your desired style.
Tools and Techniques for Styling Layered Hair
I’ll let you in on a secret: having the right tools makes all the difference when styling your layered hair, from a quality round brush to a professional-grade blow dryer.
You’ll need to master hot styling tools like flat irons and curling wands to create those perfect, flowing layers that move naturally.
I’ve found that proper blow-drying technique is essential – always direct the airflow downward and use a concentrator attachment to keep your layers smooth and frizz-free. Additionally, incorporating Chic Summer Haircuts into your styling routine can enhance the overall look and maintain your layers throughout the vibrant summer months.
Essential Layering Hair Tools
To create gorgeous layers in straight hair, you’ll need the right arsenal of styling tools and products.
I’ve found these essentials make all the difference when styling those flowing layers:
- A professional-grade blow dryer with concentrator nozzle
- Round ceramic brushes in various sizes
- Heat protectant spray and lightweight volumizing mousse
- Quality shears for regular trim maintenance at home
Hot Styling Products Guide
Styling layered straight hair becomes effortless when you’ve got the right hot tools and know exactly how to use them.
I always reach for my trusty flat iron for sleek definition and my round brush with blow dryer for volume at the roots.
For those perfectly flipped ends, I’ll use a 1-inch curling iron, keeping the barrel parallel to create subtle movement.
Blow-Drying Layered Hair Tips
A successful blow-dry starts with sectioning your layered hair into manageable parts.
I’ll show you my foolproof method that transforms limp layers into bouncy, flowing locks.
- Work with damp hair and apply heat protectant from roots to ends.
- Blow-dry each section using a round brush, starting at the nape.
- Pull the brush upward and outward while following with the dryer.
- Cool-shot each section to lock in volume and shine.
Celebrity-Inspired Long Layer Haircuts

Celebrities consistently set the trends for stunning long layered haircuts, giving us endless inspiration for our own transformations.
I’m obsessed with Jennifer Aniston’s signature face-framing layers and Kate Middleton’s bouncy, royal blow-out.
If you’re looking to channel star power, I’d also recommend Priyanka Chopra’s sultry, cascading layers or Sofia Vergara’s voluminous, graduated cut.
How to Communicate Your Layer Goals to Your Stylist
Getting exactly what you want at the salon starts with clear communication with your stylist.
I’ve learned that being specific about your layer goals makes all the difference in achieving that perfect flowing look.
- Bring photos showing both what you like and don’t like
- Describe where you want the shortest layer to fall
- Specify if you prefer blended or distinct layers
- Mention your styling routine and time commitment
Creating Volume With Strategic Layer Placement

While straight hair can sometimes fall flat, strategic layer placement is your secret weapon for creating natural-looking volume and movement. I’ll teach you exactly where to place those layers for maximum impact.
Start with face-framing pieces at the chin, then add longer layers around the crown and mid-lengths. This technique creates lift at the roots and gorgeous, flowing movement throughout your hair. Additionally, adding layers is a great way to enhance your hairstyle and complement your features as you embrace your age.
Long Layers That Work for Different Hair Densities

Since every head of hair tells its own unique story, I’ll help you choose the perfect long layers for your specific hair density.
- Fine hair needs minimal, face-framing layers starting at chin level to maintain fullness and avoid stringy ends.
- Medium hair thrives with graduated layers from collarbone down for natural movement.
- Thick hair can handle dramatic layers starting at the crown.
- Super-dense hair benefits from internal layers to remove bulk while preserving length.
Blending Techniques for Seamless Layer Transitions
The best layered haircuts come to life through expert blending – it’s what separates professional results from choppy, DIY disasters.
I always recommend point-cutting and texturizing techniques to create soft shifts between layers. Use thinning shears at a 45-degree angle for seamless blends, and don’t forget to cross-check your work by examining the layers from multiple angles.
Heat Styling Methods for Enhanced Layer Definition

Properly defining long layers requires strategic heat styling to bring out their full potential.
I’ve found that the right heat techniques can transform flat layers into beautifully flowing dimensions.
- Start with a heat protectant spray and rough dry hair upside down.
- Use a round brush to create tension while blow-drying each layer.
- Direct the airflow downward to seal the cuticle and boost shine.
- Finish with a flat iron, angling slightly outward at the ends.
Growing Out Layers While Maintaining Style

While heat styling creates gorgeous definition, growing out layers requires a different kind of patience and strategy.
I’ll let you in on a secret: trim only your shortest layers every 8-10 weeks while letting the longer ones grow.
Use texturizing products to blend any awkward changes, and try face-framing braids or twisted sections to camouflage uneven lengths.
Trust me, it’s worth the wait.
I’ve found that long layers are truly a game-changer for straight hair – they’re like magic wands that transform flat strands into flowing masterpieces. Whether you’re blessed with fine or thick hair, these versatile cuts can work wonders for your style.
Trust me, once you embrace the right layering technique for your face shape and hair type, you’ll never look back at one-length cuts again.