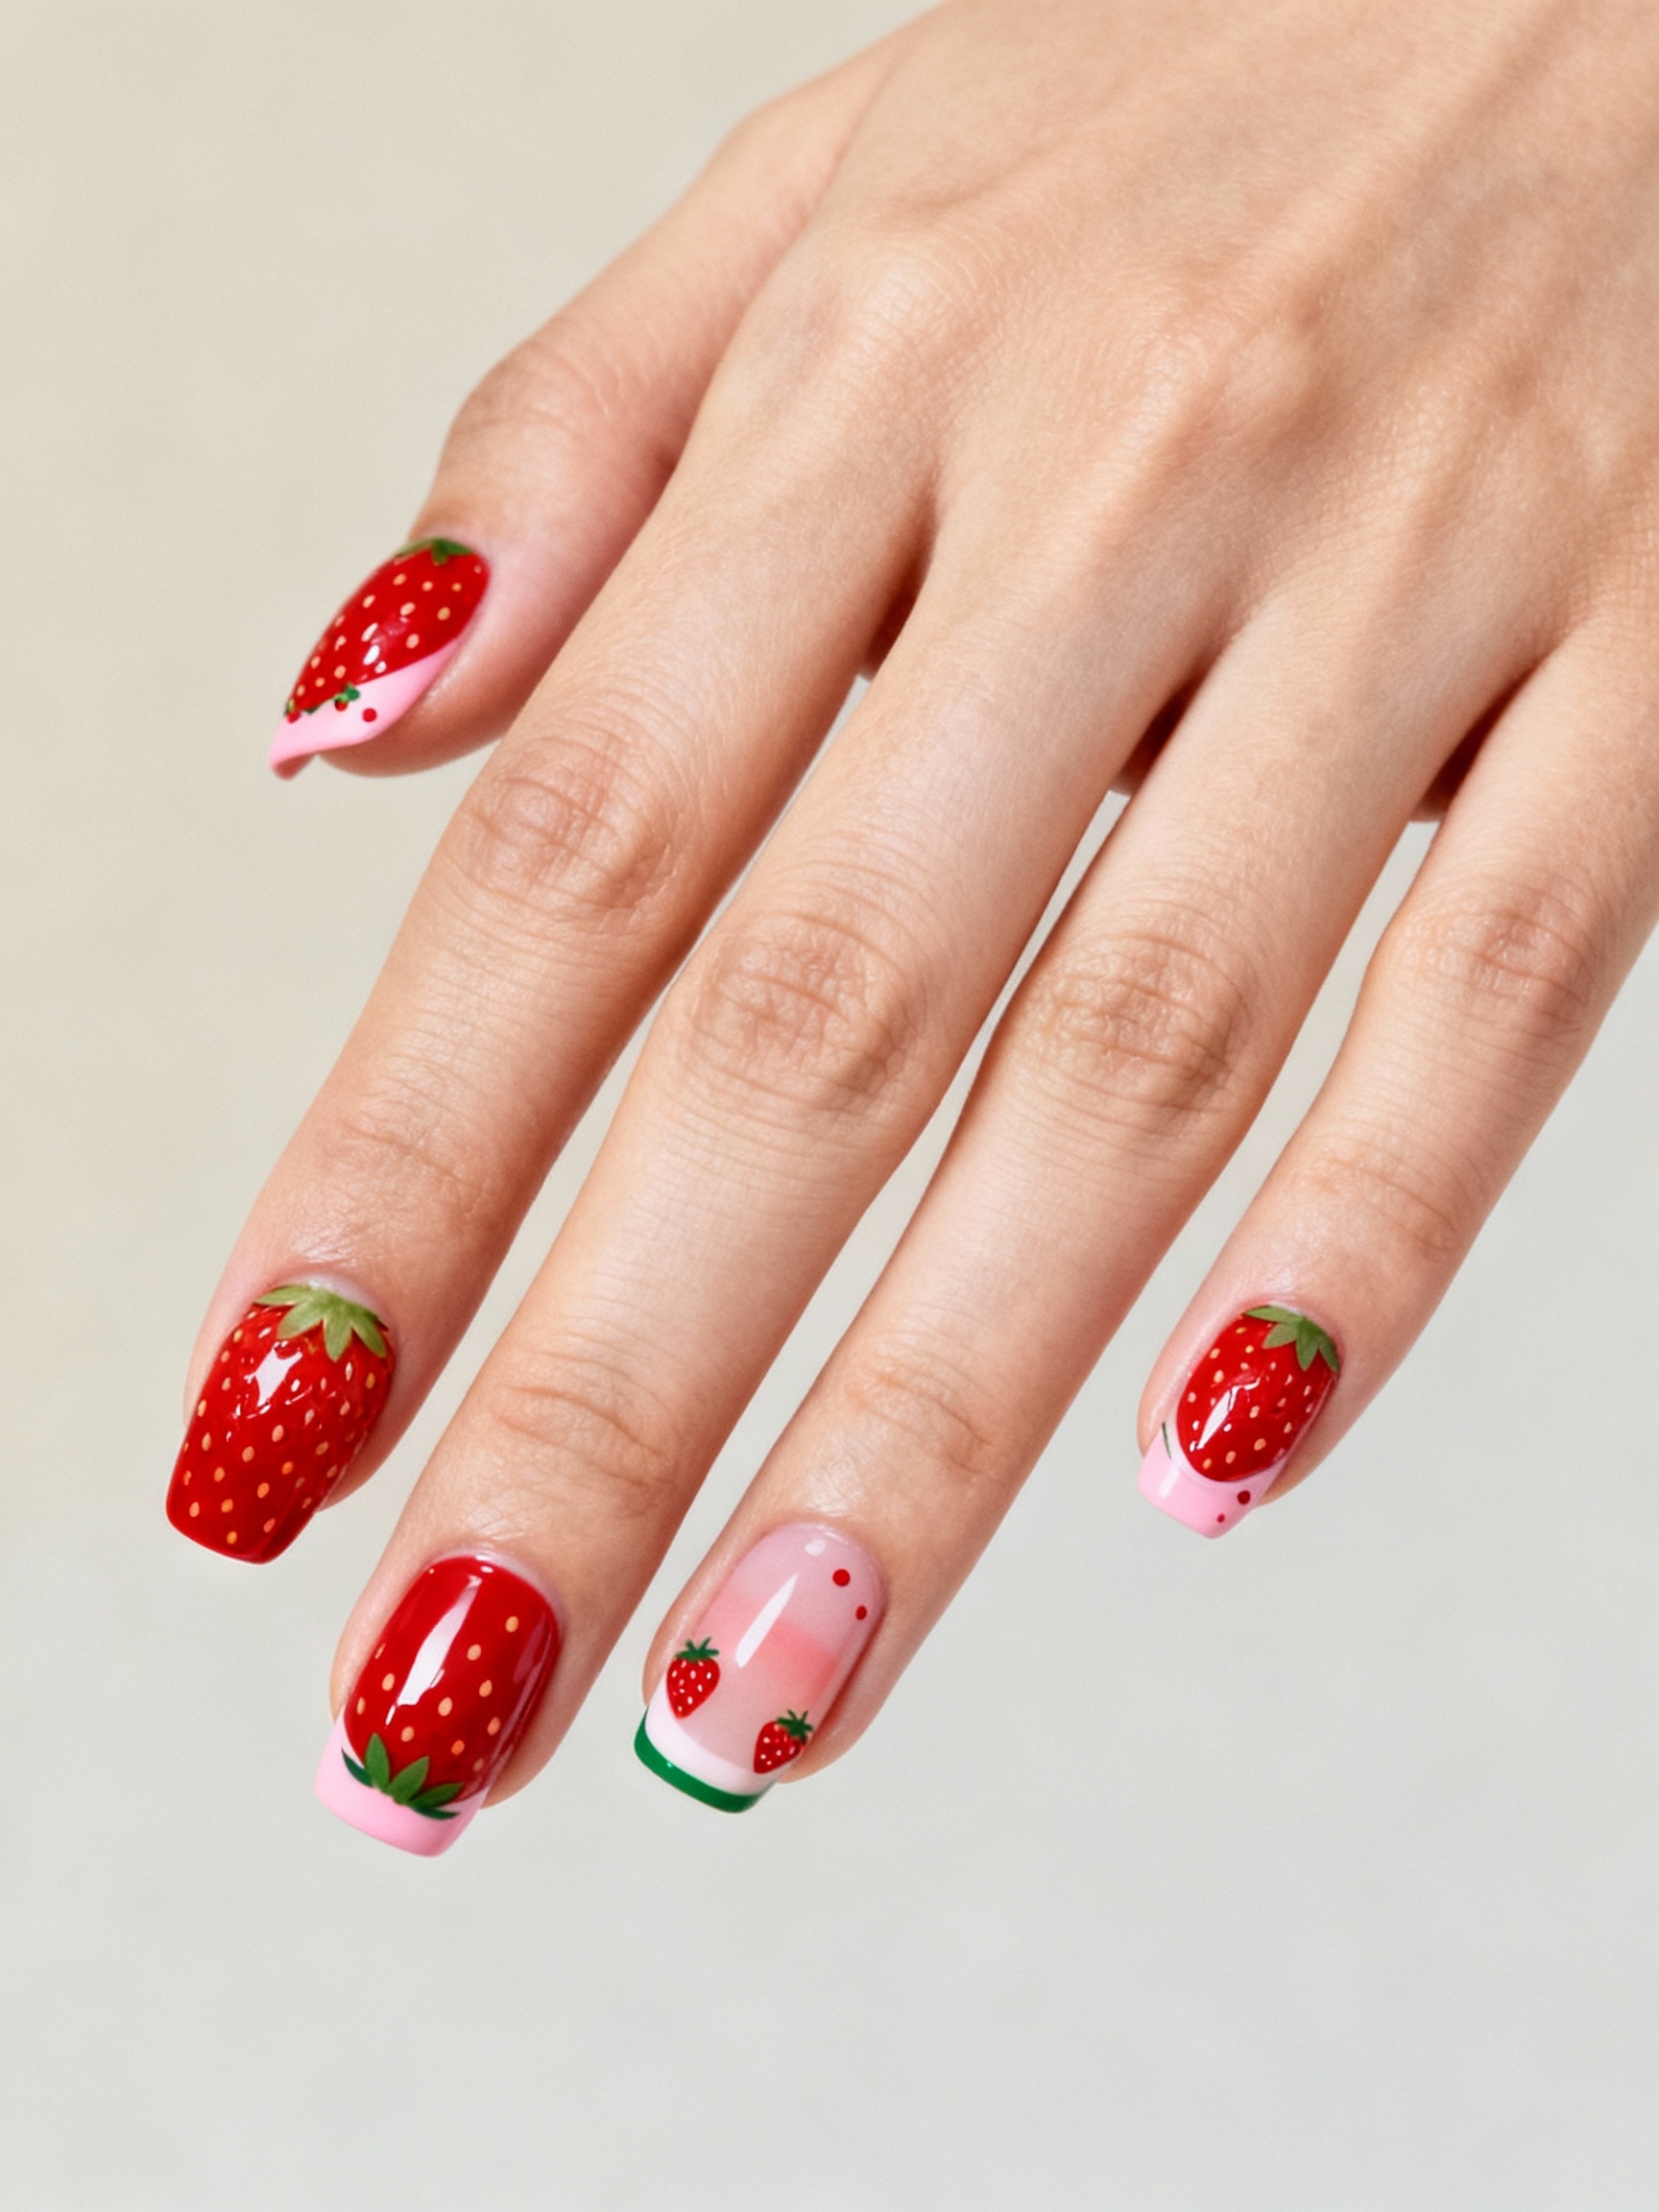
The first time a client asked me for strawberries on her nails, it was the week the farmers market filled up with the real thing. Now every June the requests come in like clockwork, because nothing says sweet summer quite like a tiny berry painted on each finger. Strawberry nails are pure seasonal joy. They range from a single dainty fruit to a full juicy red set.
These twelve ideas run that whole sweet spectrum, from a barely-there micro berry over sheer skin to 3D charms dripping down a glossy red tip. Each comes with the technique, a rough cost, and the tip that keeps the fruit looking cute rather than clumsy. Pick the berry that matches your summer mood and your steadiness with a tiny brush.
Strawberry Nails, the Sweet Basics
A strawberry on a nail is simpler than it looks: a small red heart-shape or oval for the body, tiny dots for the seeds, and a little green cap and stem on top. I tell clients to master that one motif first, since every design here is then within reach, from a single berry to a whole patch.
Most strawberry nails start from a sheer, milky, or pastel base so the red fruit pops, and the simplest versions take about fifteen minutes at home. A salon set with detailed berries or 3D charms runs roughly $45 to $70, while a few painted berries over your own polish cost very little.
Glossy Strawberry French Tips

A strawberry French tip is the sweetest update to the classic, swapping or adding to the white tip with a tiny painted berry at the edge of each nail. The familiar French shape keeps it tidy and wearable. The little strawberry brings the summer fun, so it looks cute rather than childish.
Let the French Carry It
Paint a soft pink or red French tip, then add one small strawberry near the tip of an accent nail, with seeds and a green cap. A glossy top coat makes the whole thing look juicy and finished.
It is the design I steer first-timers toward, since you only need to paint one or two berries rather than a full set. The French does most of the work, and the single fruit is the charm.

Sheer Nude With Strawberries

Sheer nude with scattered strawberries is the grown-up, minimal way to wear the trend, the soft skin-toned base letting a few tiny berries float like a delicate print. The barely-there base keeps it office-appropriate. The small fruits add a wink of summer sweetness.
Small and Few Is the Secret
Lay a sheer nude or milky base, then dot two or three small strawberries across one or two nails, keeping them tiny and well-spaced. The negative, bare-looking base is what makes the berries feel like a refined print rather than a busy design.
It is among the most wearable berry looks, sweet enough to feel playful but quiet enough for work. Keeping the strawberries small and few is the whole trick to its grown-up charm.
📋Your Strawberry Nail Kit
- ✓A base coat, a glossy top coat, and a sheer, milky, or pastel base color.
- ✓Red or pink for the berries, plus green for the caps and stems.
- ✓A dotting tool and a thin brush, or strawberry stickers if you prefer.
Sheer Milky Speckled Nails

A milky base flecked with tiny red speckles is the most abstract take, suggesting strawberry seeds without painting whole berries. The soft milky white nail scattered with little red-brown specks looks like the inside of a strawberry or a speckled egg, fresh and subtle and very modern.
It is the design for someone who loves the strawberry idea but finds full fruit too literal, and it comes together with a flecked top coat rather than careful hand-painting, which makes it forgiving and quick. The speckles do all the work, so there is no fiddly fruit to draw.
- Build a milky white base in two or three sheer coats over a buffed nail.
- Use a speckled or flecked top coat for the seed effect, no painting needed.
- Keep the speckles light so the milky base stays soft and clean.
Pastel Pink Strawberry Dots

Pastel pink with simple strawberry dots is the easiest hand-painted berry look, building the fruit from nothing but dots. On a soft pink base, a cluster of small red dots with tiny white seed dots and a green cap dot looks instantly like a strawberry, even with no brushwork.
Build the Berry From Dots
Use a dotting tool to build each berry from a few red dots in a rough triangle, then add white seeds and a green cap. The dotted, slightly abstract style is part of the charm and forgiving of an unsteady hand.
It is a sweet, beginner-friendly design that looks far harder than it is. The pastel base keeps it soft, and the dotted berries feel handmade and cheerful rather than precise.
👍Why Strawberry Nails Win
- +Scale from one tiny berry to a full juicy set, so they suit any taste.
- +Dotting tools and stickers mean you do not need to paint freehand.
- +Sheer and pastel bases hide grow-out and read grown-up.
👎Worth Knowing
- –Bright reds and pinks can stain without a base coat.
- –3D charms catch and snag, so they need babying.
- –Oversized berries tip the look into cartoonish fast.
Neon Berries With Stems

Turning up the brightness, neon berries with stems make the fruit pop in electric red against a clear or pale base. The vivid neon strawberries, finished with little green stems and leaves, feel bold and playful, a summery, eye-catching version for festivals and bright wardrobes.
Paint the berries in a true neon or candy red over a clear or white base so the color glows, then add green stems and seeds. The bright fruit against the clean base is what gives this look its fun, juicy energy.
- Use a neon or bright candy red so the berries glow against the base.
- Add green stems and leaves to make the fruit unmistakable.
- A white or clear base makes neon berries look brightest.
Glassy Jelly Red Strawberry

A jelly red strawberry set leans into the juicy theme with a translucent, glassy red that looks like the fruit itself, squishy and see-through. The sheer jelly red glows like sunlight through a strawberry, and a few painted seeds turn the whole nail into a berry.
Build a sheer jelly red over a clear or pale base, layering it so it stays translucent rather than opaque, then add tiny seed dots and top with a thick glossy coat. The result is a whole-nail strawberry effect that looks good enough to eat.
- Layer a sheer red over a clear base for the squishy jelly effect.
- Add small white or yellow seed dots scattered over the red.
- A thick glossy top coat gives the juicy, glass-like shine.
Which strawberry set is yours? Match your mood.
1Subtle and grown-up
Sheer nude with a few berries, milky speckles, or a cuticle accent keeps it refined.
2Bold and juicy
Neon berries, a jelly red set, or 3D charms turn the sweetness all the way up.
Negative-Space Strawberry Cuticle Art

Cuticle strawberry art places a tiny berry near the base of the nail and leaves the rest bare, a modern, minimal twist that uses negative space. The small strawberry tucked at the cuticle, with the rest of the nail clear or sheer, feels fresh and editorial, never cute-overload, and the bare nail keeps it grown-up and light.
Because the design sits at the base, grow-out barely shows, which makes it a smart low-maintenance pick. It is the strawberry look for minimalists, proof that one tiny, well-placed berry can be more striking than a whole painted patch.
- Paint one small strawberry near the cuticle and leave the rest bare.
- The negative space keeps it modern and disguises grow-out.
- Keep the berry tiny and detailed so the minimal placement reads intentional.
3D Strawberry Charms With Drips

For full maximalist fun, 3D strawberry charms with drips turn the nails into a sweet, sculptural treat, raised berry charms sitting over a glossy red drip design. Tiny 3D strawberry charms placed on the nail, with red paint dripping down like syrup, make a playful, tactile set you feel as much as see.
Paint a dripping red design down from the tips, then attach small 3D strawberry charms with gel or nail glue and seal around them. It is bold, fun, and a real statement, the kind of set that gets noticed and is best saved for when you can baby the raised charms.
- Use gel or strong nail glue so the 3D charms hold securely.
- Paint the red drips first, then place the charms over them.
- Save this one for low-key days, since 3D charms catch and snag.
Velvety Raspberry Matte With Seeds

A velvety raspberry matte is the sophisticated, autumn-leaning berry look, a deep raspberry red in a soft matte finish with subtle seed detail. The matte top coat gives the raspberry a suede-like depth. Tiny tonal seeds keep the fruit theme without any bright, cartoonish color.
- Paint a deep raspberry red and finish with a matte top coat for suede texture.
- Add seeds in a tonal gold or cream for a subtle, grown-up berry hint.
- The matte raspberry suits autumn as much as summer.
Bold Checkerboard With Strawberries

Mixing two trends, a strawberry checkerboard pairs the retro grid with sweet berries for a playful, maximalist set. A red-and-white or pink-and-white check on some nails, with painted strawberries on the accent nails, brings together graphic and cute in one cheerful summer look.
Lay a checkerboard grid with tape or a striping brush on one or two nails, then paint strawberries on the others so the two ideas balance. The contrast of the geometric check and the soft fruit is what makes it fun, and keeping each idea to its own nails stops it from looking cluttered.
Blushing Strawberry Ombre

A strawberry ombre fades from soft blush at the base to a riper red at the tips, like a strawberry ripening, with optional tiny berries on top. The gentle gradient alone evokes the fruit, blushing pink deepening into berry red, which makes it a softer, more wearable take on the theme.
Let the Gradient Do the Work
Sponge a soft pink at the base and blend it into a deeper strawberry red at the tips, keeping the fade smooth. A few tiny painted berries near the tips push it fully into strawberry territory, though the ombre is sweet enough on its own.
Clients ask me for this ombre when they want the berry mood without a single painted fruit. It is a pretty, grown-up look that needs no detailed painting, just a soft gradient. The ripening-fruit effect is charming and far more elegant than a literal painted strawberry.
Micro Strawberries in Negative Space

The daintiest design of all, micro strawberries in negative space scatter the tiniest possible berries across a clear or sheer nail, so they look like they are floating. The minuscule fruits against the bare nail feel delicate and modern, the most refined way to wear strawberries on your hands.
Paint the smallest berries you can manage, a few red dots with a green fleck, across a clear or milky base, leaving lots of open space around them. The tininess is the whole point, since micro art looks expensive and editorial where bigger fruit feels playful.
- Paint the berries as small as you can for the most refined effect.
- Leave plenty of bare space so the micro fruit looks like it floats.
- A clear or milky base keeps the tiny berries the only focus.
Common Strawberry Nail Mistakes to Avoid
The biggest strawberry nail mistake is making the berries too big. Oversized fruit quickly tips from cute into cartoonish, so keep each strawberry small and dainty, even on a bold set, and let a few well-painted berries do more than a nail crowded with giant ones. The second slip is forgetting the green. A red blob with seeds is just a red shape; it is the little green cap and stem that make the eye see strawberry, so never skip them, however tiny.
A couple of practical habits keep the look sweet. Always use a base coat under bright reds and pinks, which stain the natural nail more than most colors, and seal any painted berries or 3D charms under a generous glossy top coat so they do not chip or catch.
If hand-painting feels daunting, lean on a dotting tool, fruit stickers, or stamping plates, which give crisp little berries far more easily than a brush. Keep the fruit small, seal it well, and your strawberry nails will look fresh-picked rather than messy.
Questions About Strawberry Nails
?How do I paint a strawberry on my nails?
Make a small red heart-shape or oval for the body, add a few white or yellow seed dots, then top it with a little green cap and a stem. A dotting tool makes it far easier than a brush, and keeping the berry small is what makes it look cute rather than clumsy.
?What is the easiest strawberry nail for beginners?
Pastel pink with dotted strawberries, or a single berry on a French tip. Building the fruit from dots with a dotting tool needs no fine brushwork, and painting just one or two berries rather than a full set keeps it quick and forgiving.
?How do I stop red strawberry nails from staining?
Always use a base coat, since bright reds and pinks stain the natural nail more than most shades. Seal the design with a glossy top coat too, which protects the color and keeps the painted berries from chipping at the tips.
?Which strawberry nail style suits deep skin tones?
Bright and deep berry reds, jelly reds, and warm raspberry shades glow beautifully against deep, melanin-rich skin. Vivid, saturated reds and warm pinks pop, while very pale, milky bases still work as a soft backdrop for the fruit.
A Whole Summer in a Berry
Strawberry nails are the easiest way to carry a little summer joy on your hands, and the same sweet motif stretches from a single dainty berry for the office to a full juicy red set for a festival. Whether you paint a tiny strawberry at the cuticle, fade a blushing ombre, or stack on 3D charms, the trick is to keep the fruit small and the base soft so it reads fresh-picked rather than busy.
Start with a single berry over a sheer base if you are new to painting fruit, then build toward a fuller set as your dotting hand gets steadier. For more summery ideas, browse a few cute summer nails or some simple summer nails designs to round out your warm-weather rotation.
More Hair Inspiration