Run a finger across a fresh set of black acrylics and you feel it before you see it: the glassy slip of a mirror topcoat, the razor edge of a stiletto tip, the faint ridge where a tiny 3D bat sits. That tactile drama is the whole appeal of acrylic Halloween nails.
The goal here is spooky that still looks expensive. I build these sets at the desk every October, and the trick is balance. One or two focal nails, a tight palette, and clean lines keep them couture. Below are fourteen designs, each with how it is built, what it costs, and who it suits, so you can pick a set that turns heads after dark.
Before You Book Halloween Acrylics
- Keep it luxe with restraint: one or two focal nails, a tight palette, and clean lines beat a busy ten-finger scene.
- A full acrylic set with Halloween art runs roughly $60 to $120 and takes one to two hours.
- 3D charms should be lightweight and locked with builder gel; too many snag on sweaters and lift fast.
- Book early. The two weeks before Halloween are the busiest of the year at most nail salons.
Glossy Black Stiletto Tips

One swipe of inky polish takes a stiletto tip from basic to bold. A glassy black finish sharpens every gesture, sleek and dramatic with zero fuss, which is why it is the design I steer Halloween clients toward when they want impact in one color.
Keep the shape razor-clean and let the length do the talking. A mirror topcoat is what turns flat black into liquid obsidian.
- Ask for a crisp, symmetrical stiletto point and a high-shine gel topcoat.
- Style them with silver rings, leather, or a crimson lip for instant edge.
- Stilettos are dramatic but catch and snag, so size the length to your real life. The black nails guide has softer shapes too.

Smoky Charcoal-To-Gray Ombré Fades

Sharp tips are fierce, and a smoky ombré is the moodier sister. You blend charcoal into black, then fade to a sheer gray for that haunted-lantern glow. It chills in the best way and stays wearable past October.
- Ask for a sheer-to-deep gradient with a soft, diffused cuticle.
- Layer translucent black gel and cure between coats for real depth.
- Finish with a velvet matte topcoat for that foggy, candlelit feel.
Heads-Up
Never peel or pry acrylics off. It pulls layers of your natural nail away and leaves the bed thin and sore for weeks. Always soak them off with acetone, at the salon or carefully at home, even when one is already lifting.
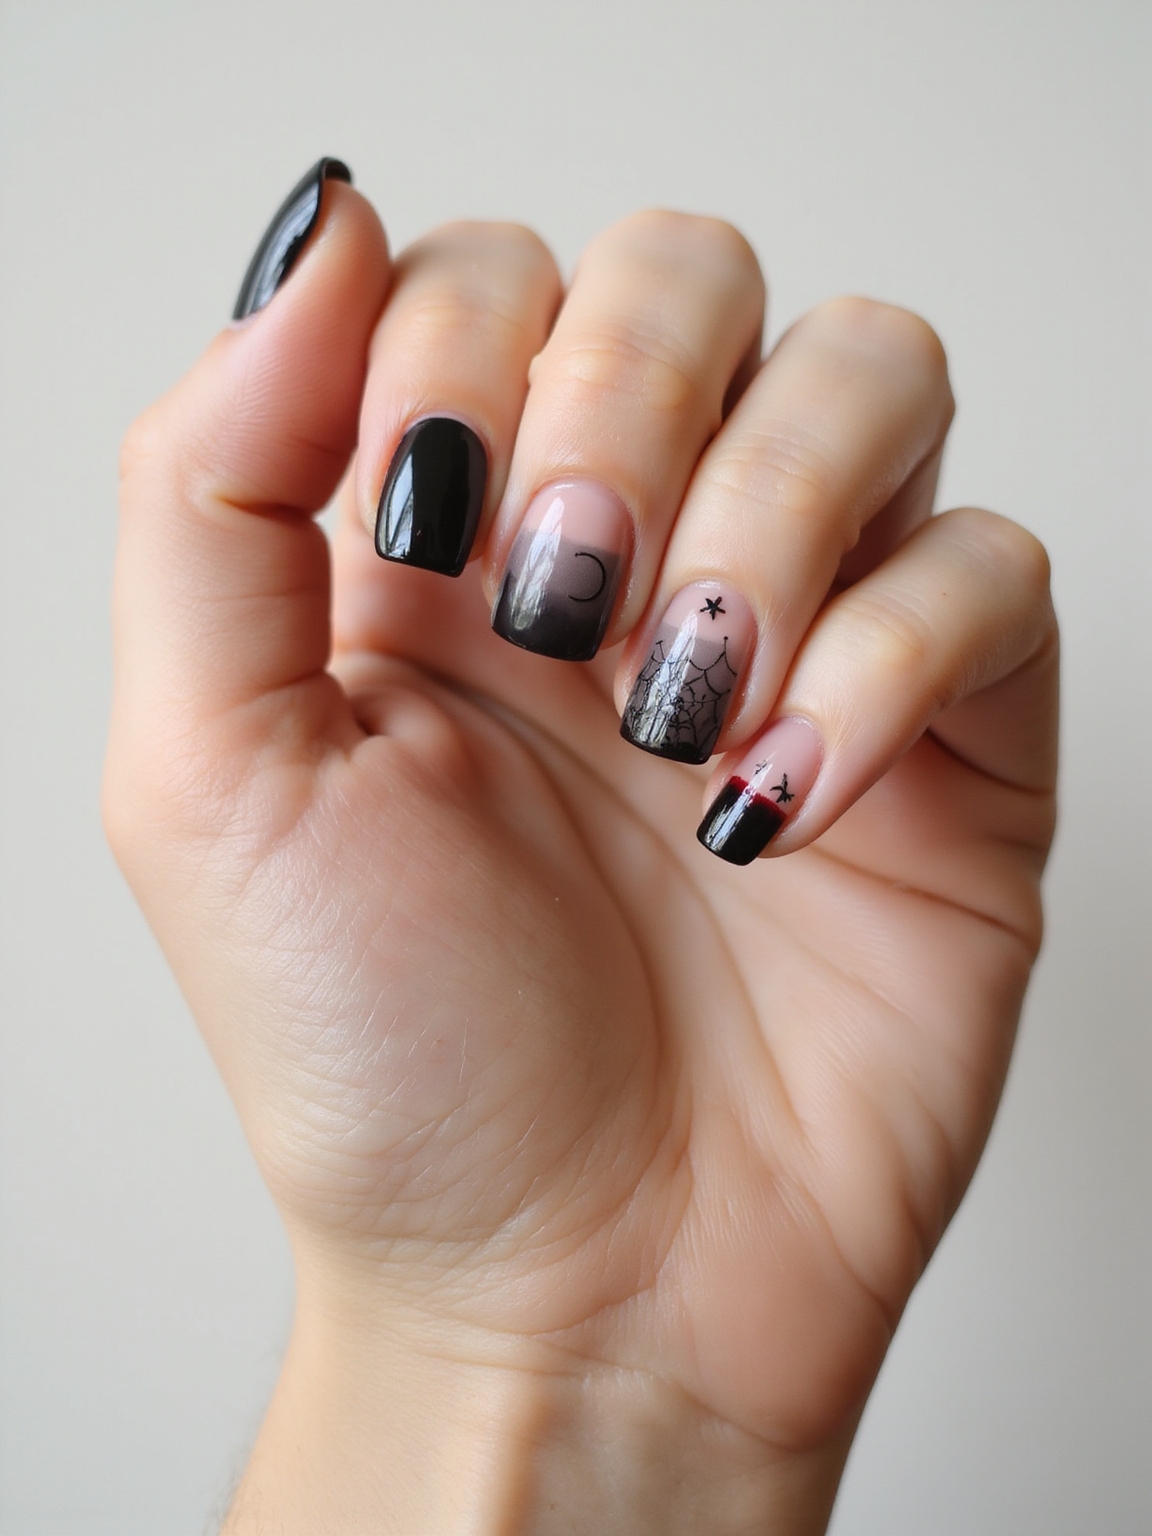
Silver-On-Black Chrome Webs

High-shine spiderweb accents turn a classic spooky motif into a mirror-bright moment. The silver-on-black contrast is bold and slick, and it photographs like jewelry under any light.
Why Chrome Is A Salon Job
For real drama, the webs get traced in 3D gel linework, which gives the chrome a sculpted, raised finish you can feel. It is a salon job, since chrome powder needs a no-wipe gel base to stay reflective.
Keep the webs on one or two accent nails so the set stays chic. Our chrome nails guide covers the mirror finish in more depth.
Sheer Milky Ghost Silhouettes

Negative space is the chicest way to do cute-spooky. You start with a sheer, milky base so floating ghost silhouettes look like they are drifting across the nail on their own.
- Choose a cool-toned sheer or milky jelly base for that porcelain look.
- Outline the ghost shapes in crisp white or inky black for contrast.
- Keep the layers thin and glossy so the cutouts read sharp and modern.
📋Before your Halloween nail appointment
- ✓Save one clear reference photo and decide which one or two nails are the focal point.
- ✓Pick a tight palette of three shades so the set looks intentional.
- ✓Book at least a week ahead; salons fill up fast before Halloween.
Candy-Apple Blood-Drip French Tips

Blood-drip French tips look freshly bitten, equal parts chic and chilling. The base is a crisp nude with a razor-sharp smile line, then glossy candy-apple drips that pool at the edge like fresh fang marks. It is the design that gets the most gasps at the desk.
- Pick a sheer nude base and a deep oxblood or candy red for the drips.
- Paint a fine French line, then drag the drips downward with a thin brush.
- Seal with an ultra-gloss topcoat so the drips look wet and wicked.
Velvet Matte Meets Glossy Shine

The boldest move is texture, not more color. You pair a velvet-black matte base with high-shine accents, and the contrast does all the work. The plush matte softens the drama while the gloss pops like moonlight on obsidian.
- Trace shiny spiderwebs or a glossy smile line over a foggy matte base.
- Try mixed-finish French tips: matte beds with glossy smiles for quiet drama.
- Use a true matte topcoat, then spot-gloss only the accents you want to catch light.
👍Why acrylics work for Halloween
- +They hold length, charms, and detailed art that regular polish cannot.
- +A set lasts through every party from mid-October on.
- +Sculpted shapes like coffin and stiletto add instant drama.
👎What to weigh first
- –Improper removal damages the natural nail underneath.
- –Long stiletto and coffin tips snag and catch on fabric.
- –Detailed art and charms add cost and appointment time.
Neon Slime Accents On Jet-Black

Neon slime over jet-black acrylics delivers that haunted-lab energy in seconds. A high-contrast ooze in chartreuse, toxic lime, or UV-reactive green streams from the cuticle like a fresh spill.
Keep the edges a little imperfect for that just-dripped realism. A glassy topcoat over the top makes the slime look wet and alive.
- Stream the neon from the cuticle down and leave the drip edges uneven.
- Add micro-bubbles or a thin silver outline for a slick, eerie finish.
- A UV-reactive green is a fun pick if your plans involve blacklight.
Coffin-Shaped Moody Metallic Classics

Coffin nails are sleek, tapered, and unapologetically fierce, which makes them the natural canvas for moody Halloween glam. I balance deep hues with razor-clean lines and let the silhouette do the scare.
The detail is what keeps it chic. Inky lacquers, a metallic veil, and edgy micro-linework look luxe when the palette stays tight and the lines stay clean.
A few combinations I love: matte black with thin silver French tips, deep oxblood ombré fading to smoke, or glossy raven with ultra-fine spiderweb linework. Coffin length needs a sturdy builder underneath, so talk to your tech about reinforcement.
🅰️Glossy finish
Wet, reflective, and dramatic. Best for chrome webs, blood drips, and slime where shine sells the effect.
🅱️Matte finish
Foggy, plush, and moody. Best for smoky ombres, skeleton linework, and parchment sigils where you want depth, not shine.
Lightweight 3D Charms: Fangs, Bats, Tombstones
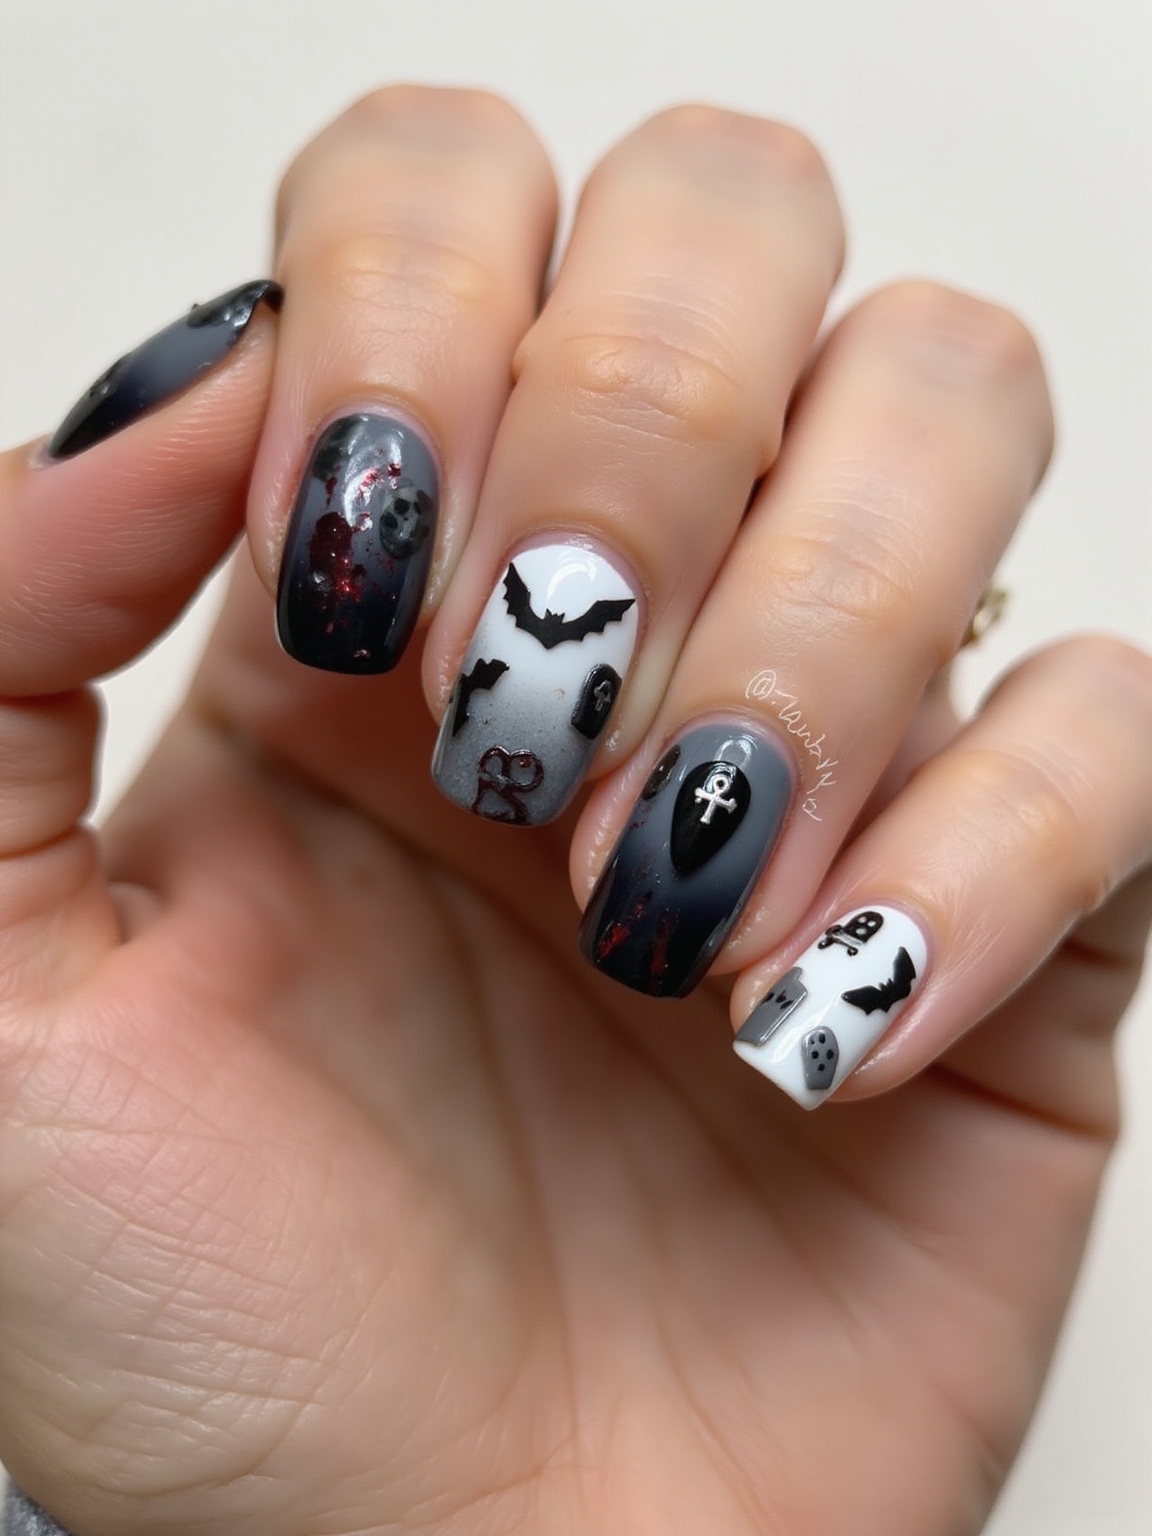
A single 3D charm takes a set from flat to sculptural, as long as you keep it light. Think dainty fangs, sleek bats, or a tiny tombstone, picked in airy metals or hollow resin so they do not weigh the nail down or snag on a sweater.
Locking Charms So They Stay
Locking them in is where the skill lives. A dot of builder gel or strong resin holds a charm far better than regular polish, which is why a peel-off charm usually means a peel-off nail.
Balance is everything with 3D. One or two charms on accent fingers looks edgy, while a charm on every nail looks overcrowded and lifts within days.
Poison-Apple Reds And Toxic Greens

Nothing says wickedly chic like a venomous color story. I lean into poison-apple red and toxic green for a set that looks bitten and bewitched, glossy and a little dangerous.
A blood-red base with acid-lime tips and a jelly gradient that drips like syrup is the loud version. For something subtler, add chrome flashes, micro-pearls, or a patch of matte-black negative space for bite.
Keep the cuticles crisp and the lengths sculpted, then finish with a glassy topcoat for that lethal shine. This high-contrast pairing flatters every skin tone, and deeper skin makes the acid green look especially electric.
Witchy Sigils On Parchment Bases
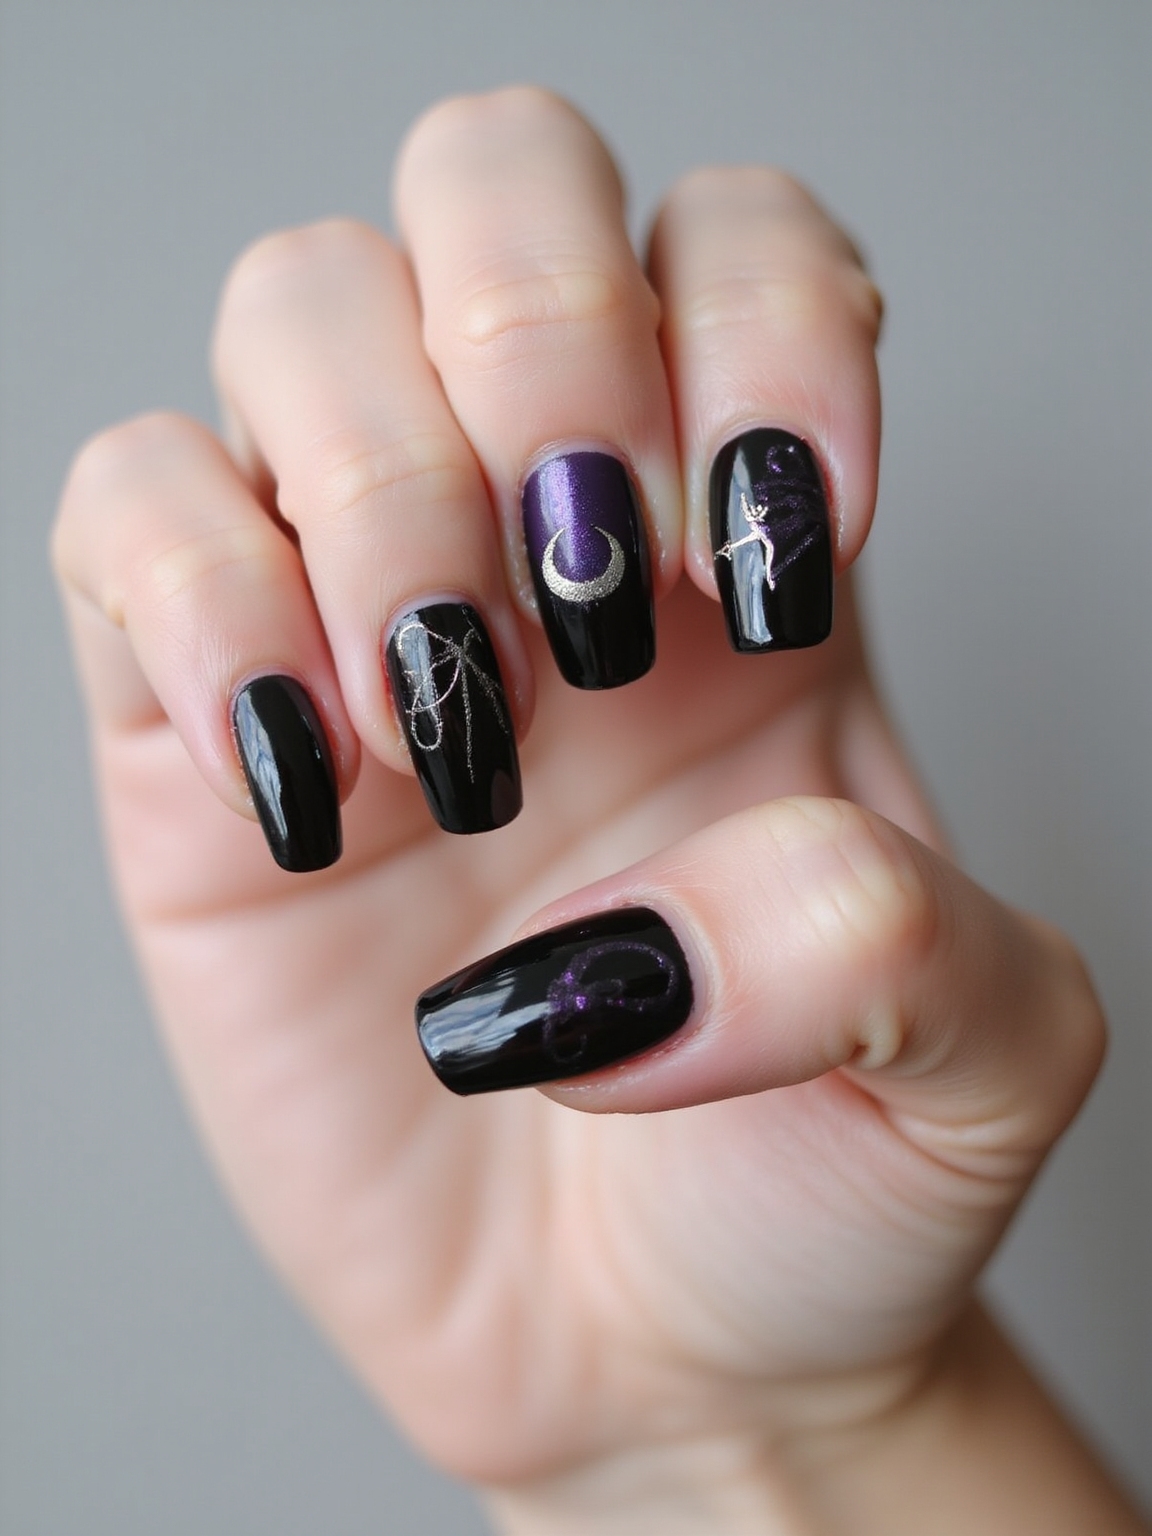
The real magic is in the linework. I ink spellbook script and witchy sigils whisper-thin, like inked secrets across a glossy coffin nail, then anchor them with jet-black accents so they do not float.
Smoky mauve bases with bone-white lettering land haunting and chic at once. This is detail work, so it is worth a tech with a steady hand and a fine brush.
- Choose a moody base like smoky mauve, charcoal, or deep plum.
- Add micro-fine rune or script lines with a detail brush.
- Seal with a matte topcoat for that aged-parchment feel.
Holographic Moonlit Specters

For ghostly energy without the costume, holographic veils catch light like prism trails. I layer a sheer charcoal jelly, then mist a moonbeam shimmer topcoat so the nails glow like fog under a streetlight.
It is ethereal, modern, and perfectly eerie for crisp-night plans. The shimmer does the heavy lifting, so the rest of the design can stay minimal.
- Build a sheer charcoal jelly base, then add a holographic shimmer topcoat.
- Float negative-space crescents, pearly cuticle halos, or tiny starbursts.
- Finish with a glassy seal so the shimmer glows like moonlight.
Gilded Pumpkins And Foil Leaves

Not all Halloween nails have to be dark. For a luxe harvest spin, tiny gilded pumpkins and burnished foil fronds look hand-plucked from a chic autumn wreath. Creamy latte bases keep them warm and wearable well into November.
Whisper-thin metallic veins and micro-studded stems give that glowy, expensive depth. This is the set I recommend for anyone who wants seasonal without spooky.
- Try matte taupe with a cluster of accent pumpkins on one nail.
- Or glossy amber with scattered foil leaves for a warmer glow.
- Deep espresso French tips with gilded cuticles read luxe and grown-up.
Inky Skeleton-Hand X-Ray Linework

Bone blueprints make the coolest contrast against inky fall hues. I sketch slender phalanges and airy x-ray linework in crisp white gel over midnight black, then add a matte top for that film-scan look. It feels edgy, graphic, and never gory.
For extra dimension, float ghosty shadows, add micro-shimmer cuticles, or keep a single ring-finger motif as the focal point. Clean and graphic always beats crowded with this one, so let the negative space breathe.
Maintenance & Care
Acrylics are a commitment, and treating them well is what keeps your natural nails healthy underneath. A full set lasts two to three weeks before the regrowth shows, and a fill every two to three weeks keeps the shape and protects the bed. Budget $60 to $120 for the initial set with art, and roughly $40 to $60 for a fill.
The single most important rule is removal. Never pry, peel, or bite acrylics off, because that takes layers of your real nail with it. Have them soaked off properly with acetone at the salon, or soak at home with patience, then give your nails a few days with a strengthening oil before the next set. Keep a cuticle oil on hand and a tiny tube of nail glue for any lifted charm, and your set will look fresh right through the season.
Spooky, But Make It Couture
From glossy stilettos and smoky fades to chrome webs and drip-detailed French tips, acrylic Halloween nails can bring real couture energy to spooky season. The thread through all of them is restraint: a tight palette, clean lines, and one or two focal nails.
Pick the set that matches your plans, save a clear photo for your tech, and book it early. Done with a little balance, these designs haunt in the chicest possible way, and they will outlast the candy in the bowl by a couple of weeks.